sexta-feira, 29 de agosto de 2014

Bash Script to parse access log - keywords: parse, awk, bash, statistics, time taken

1. Introduction

Guilherme Junqueira's script to parse access.log

2. Script


#!/bin/bash

#######################################################################################################
# Description: this parse calculates the time taken stats to serve each page                          #
#              It removes the parameters provided after '?' ou ';'                                    #
#              Aggregation options: second, minute, hour, day                                         #
#                                                                                                     #
# Parameters (in order):                                                                              #
#    SEP             - the separator between fields inside each file (usually ' ')                    #
#    DATE_FIELD      - Index of the field that contains the date (usually 5)                          #
#    AGG_OPTION      - Either second, minute, hour, day                                               #
#    TIMETAKEN_FIELD - Index of the field of the time taken                                           #
#    ID              - label to identify the output of the log (usually the server name)              #
#######################################################################################################

DATE_FIELD=$1
AGG_OPTION=$2
TIMETAKEN_FIELD=$3
ID='unspecified'
if [[ ! -z $4 ]];
then
   ID=$4
fi

SEP=' '
if [[ ! -z $5 ]];
then
   SEP=$5
fi

######################################################################################################
############################ Non configurable section below this line ################################

if [[ -z "$DATE_FIELD" || -z "$AGG_OPTION" || -z "$TIMETAKEN_FIELD" ]]
then
  echo
  echo "Not all parameters have been provided or set properly."
  echo "Usage: $(basename $0) DATE_FIELD AGG_OPTION TIMETAKEN_FIELD [ID] [SEP]"
  echo "Alternate usage: $(basename $0) (with parameters set internally)"
  echo
  exit 1
fi

awk -F "$SEP" -v dateField=$DATE_FIELD -v aggOpt=$AGG_OPTION -v ttField=$TIMETAKEN_FIELD -v vID=$ID '
function getDate(df, agg) {
   if( agg == "second" ) {
      split($df, a, ":");
      data=substr(a[1], 2) " " a[2] ":" a[3] ":" a[4];

   } else if ( agg == "minute" ) {
      split($df, a, ":");
      data=substr(a[1], 2) " " a[2] ":" a[3];

   } else if ( agg == "hour" ) {
      split($df, a, ":");
      data=substr(a[1], 2) " " a[2];

   } else {
      split($df, a, ":");
      data=substr(a[1], 2)
   }
   return(data)
}

{
   data=getDate(dateField, aggOpt)
   req[data]++
   time[data]+=$ttField

   if($ttField > max[data]){
      max[data]=$ttField
   }

   if( min[data] == "" ){
      min[data]=$ttField
   } else if ($ttField < min[data]){
      min[data]=$ttField
   }
}

END {
    printf("%15s;%25s;%20s;%15s;%15s;%15s;\n", "ID", "DATA", "SUM TIME TAKEN", "REQS", "MAX", "MIN");

    for(i in req){
       printf("%15s;%25s;%20d;%15d;%15d;%15d;\n", vID, i, time[i], req[i], max[i], min[i]);
    }
}'


3. References


  • Special thanks for Guilherme Junqueira

terça-feira, 19 de agosto de 2014

Installing and Configuring Spring-Tool-Suite-3.5.1 with GRAILS Grails 1.3.7

1. Introduction

This post gathers information about install and configure Spring-Tool-Suite-3.5.1 with Grails 1.3.7.

2. Step-by-Step

Step #1. Install binary

+ spring-tool-suite-3.5.1.RELEASE-e3.8.2-win32-x86_64-installer.exe
- Installation path: C:\springsource
PS: Do not use "C:\Program Files\..."
- Select the JDK path: C:\Program Files\Java\jdk1.7.0_60

Step #2. Configure automatic update

+ Spring Tool Suite :: Help >> Check for update
- [X] Spring Tool Suite
- [X] Spring UAA Integration (optional)

Step #3. Configure automatic update

+ Spring Tool Suite :: Help >> Dashboard
+ Extension
- Find "Groovy"
- [X] Groovy-Eclipse: Groovy-Eclipse plugin
- Find "Grails"
- [X] Grails Support: Support for creating Grails project

Step #4. Install Groovy software version 1.8 compatible

+ Spring Tool Suite :: Help >> Install New Software
+ add: http://dist.springsource.org/release/GRECLIPSE/e4.2
- name: Groovy-Eclipse update site 
+ Extra Groovy Compiler
- [X] Groovy Compiler 1.8 Feature
- [X] Groovy Eclipse (Required)

Step #5. Configure Grails for Spring Tool Suite

+ Spring Tool Suite :: Windows >> Preference
- Groovy >> Grails
- [Add...] [Browse] Enter Grails 1.3.7 Installation Path 
                      Name="Grails 1.3.7" 
                      Location="C:\Program Files(x86)\grails-1.3.7"

Step #6. Configure SVN Plugin Extension

+ Spring Tool Suite :: Help >> Dashboard
+ Extension
 - Find "SVN"
   - [X] Subversive: Subversive plugin

Step #7. Configure SVN Repository and Checking out In-Manager project

+ Spring Tool Suite :: Help >> Dashboard
+ Perspective: Others >> SVN Repository Exploring
- New Repository Location: http://aplic.inmetrics.com.br/com.inmetrics.manager
- Select: trunc >> com.inmetrics.inm-manager
- Checkout

Step #8. Switch Groovy Compiler

+ Spring Tool Suite :: Windows >> Preference
- Groovy >> Compiler
- [Switch to 1.8.6] 

Step #9. Install Grails Plugin

+ Spring Tool Suite :: ^ ALT G
grails> install-plugin plugins/grails-acegi-0.5.3.2.zip 

Step #10. Remove conflict JasperReports

+ Windows Command Prompt


C:\> 
  C:\> rm %HOMEPATH%\.grails\1.3.7\projects\com.inmetrics.inm-manager\plugins\jasper-0.9.7\lib\jasperreports-2.0.5.jar

Step #11. Configure Spring-Tool-Suite to avoid war generation conflict

+ Spring Tool Suite :: Windows >> Preference
- Groovy >> Grails >> Grails Launch
- [New...]
     variable=stringchararrayaccessor.disabled
     value=true


3. References


  • n/a


terça-feira, 10 de junho de 2014

Install Oracle Linux on Hyper-v


1. Introduction

This post shows screens captured step-by-step of installing Oracle Linux on Hyper-V system, since creating virtual machine, answering basic questions from setup wizzard and installation of Linux Integration Service for Linux in Hyper-v enverionment

2. Step-by-Step

This step-by-step is divided into 4 parts:
  • Part-I: Installing Oracle Linux ISO
  • Part-II: Configuring Oracle Linux system parameters
  • Part-III: Installing LIS(Linux Integration Service)
  • Part-IV: Configuring Network

2.1. Part-I: Installing Oracle Linux ISO

  • Step #1: Download Oracle Linux ISO from Oracle Site
  • Step #2: Create a Hyper-v Virtual Machine
  • Step #3: Capture "Oracle Linux ISO" an IDE device CDROM


  • Step#4: Restart Virtual Machine

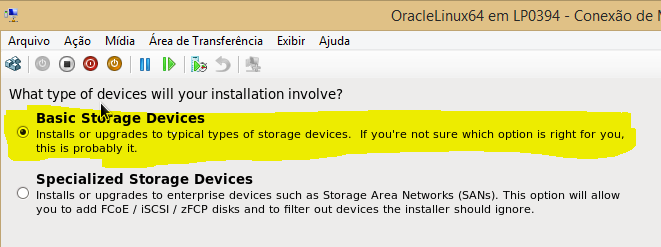
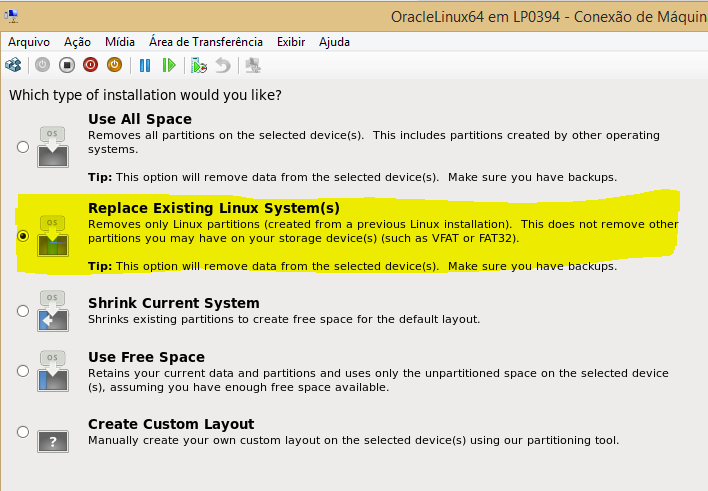
  • Step#5: Answer common setup wizzard questions as highlighted on printed screen


  • Step#6: After reboot and login as root

    2.2. Part-II: Configuring Oracle Linux system parameters

    • Step#1: Edit /etc/grub.conf and change default to 1

    • Step#2: Edit /etc/sysconfig/kernel and change delete –uek from last of DEFUALT KERNEL..line) and Reboot 


      2.3. Part-III: Installing LIS(Linux Integration Service)

      • Step #1: Capture "LIS" an IDE device CDROM


      • Step #2: Mount DVD ISO and check packages for RHEL63

      • Step #3: Install LIS packages


      2.4. Part-IV: Configuring Network

      • Step #1: Shutdown vitual machine
      • Step #2:  Add/Configure network adapter. In my case  I'll add a external virtual switch interface to bridge VM adapter with my phisical network adapter


      • Step #3: Restart VM and login
      • Step #4: Run system-config-network to configure new network adpter "eth0"


      • Step #5: Configure interface "eth0" to start onboot by editing /etc/sysconfig/network-script/ifcfg-eth0


      • Step #6: Start new interface "eth0" ifup

      • Step #7:  Reboot to check if everythig is ok 


      3. References


      quarta-feira, 7 de maio de 2014

      AWK command line to parse greater consumer from Squid access.log

      1. Introduction

      AWK command line to interpret Squid's  access.log file


      2. Example


      awk '$8 != "-" {users[$3] = $8} $2 > 600000 && ($5 / ($2/1000)) > 65536 && $6 ~ /CONNECT/ {print int(($5 / ($2/1000))/1024) " " strftime("%F %T", $1) " " users[$3] " " $0}' < /var/log/squid/access.log | sort -n -k1


      3. References


      segunda-feira, 21 de abril de 2014

      SQLServer datatype conversion tip's

      1. Introduction

      This post is gathering information about SqlServer Datatypes Conversion.

      2. Example

      2.1. This is very good sample extracted from StackOverflow


      Declare @d datetime
      select @d = getdate()

      select @d as OriginalDate,
      convert(varchar,@d,100) as ConvertedDate,
      100 as FormatValue,
      'mon dd yyyy hh:miAM (or PM)' as OutputFormat
      union all
      select @d,convert(varchar,@d,101),101,'mm/dd/yy'
      union all
      select @d,convert(varchar,@d,102),102,'yy.mm.dd'
      union all
      select @d,convert(varchar,@d,103),103,'dd/mm/yy'
      union all
      select @d,convert(varchar,@d,104),104,'dd.mm.yy'
      union all
      select @d,convert(varchar,@d,105),105,'dd-mm-yy'
      union all
      select @d,convert(varchar,@d,106),106,'dd mon yy'
      union all
      select @d,convert(varchar,@d,107),107,'Mon dd, yy'
      union all
      select @d,convert(varchar,@d,108),108,'hh:mm:ss'
      union all
      select @d,convert(varchar,@d,109),109,'mon dd yyyy hh:mi:ss:mmmAM (or PM)'
      union all
      select @d,convert(varchar,@d,110),110,'mm-dd-yy'
      union all
      select @d,convert(varchar,@d,111),111,'yy/mm/dd'
      union all
      select @d,convert(varchar,@d,112),112,'yymmdd'
      union all
      select @d,convert(varchar,@d,113),113,'dd mon yyyy hh:mm:ss:mmm(24h)'
      union all
      select @d,convert(varchar,@d,114),114,'hh:mi:ss:mmm(24h)'
      union all
      select @d,convert(varchar,@d,120),120,'yyyy-mm-dd hh:mi:ss(24h)'
      union all
      select @d,convert(varchar,@d,121),121,'yyyy-mm-dd hh:mi:ss.mmm(24h)'
      union all
      select @d,convert(varchar,@d,126),126,'yyyy-mm-dd Thh:mm:ss:mmm(no spaces)'


      3. References


      terça-feira, 15 de abril de 2014

      Script to capture traffic HTTP and HTTPS on linux interface

      1. Introduction

      Script to capture http and https traffic on linux interface

      2. Example


      #! /bin/bash

      PCAP_FILE_NAME=/tmp/http_traffic.$$.pcap
      REPORT_FILE=/tmp/http_traffic_report_`date +%Y%m%d%H%M%S`.txt
      DSTNET=10.3.0.0/16
      /usr/sbin/tcpdump -G 3600 -w $PCAP_FILE_NAME -W 1 -s 64 -i eth5 "dst net $DSTNET and (src port 80 or src port 443)"
      /usr/sbin/tcpdump -nn -r $PCAP_FILE_NAME | awk '{split($5,a,"."); print a[1] "." a[2] "." a[3] "." a[4]  ";" $NF}' | /bin/awk -F";" '{sz[$1] = sz[$1] + $2} END{for (x in sz) {print sz[x] "\t" x}}' | sort -n > $REPORT_FILE
      /sbin/ip neighb show >> $REPORT_FILE
      rm -f $PCAP_FILE_NAME